Zelda: Tears Of The Kingdom Shrine Locations Guide
Find where all the Shrines are in The Legend of Zelda: Tears of the Kingdom.
The Legend of Zelda: Tears of the Kingdom Shrines present numerous challenges. Some will test your mettle in combat, while others can stump your brain due to puzzle mechanics. Here's our guide to help you with the Shrine locations in Zelda: Tears of the Kingdom.
The Legend of Zelda: Tears of the Kingdom Shrine locations
Shrine functions, rewards, and challenges
The Legend of Zelda: Tears of the Kingdom Shrines are akin to what you've seen before if you've played Breath of the Wild. They dot the entire countryside, and you can tackle them as you go along. They also act as fast travel points, speeding up the exploration. Moreover, you'll find Shrines in the Sky region, too. We also recommend getting the Purah Pad Sensor, since this will track and ping you whenever a Shrine is nearby.
Completing a Shrine challenge/task will net you a Blessing of Light. Once you have four of these orbs, you can talk to a Goddess Statue to choose a reward. You can pick either a single heart or a stamina segment.
Shrine challenges can be divided into the following categories:
- Puzzles - By far the most plentiful, these will make use of various Zonai Devices and abilities, as well as your wit and creativity, as you try to reach the end goal.
- Combat Training - These will teach you the basic mechanics. However, do take note that the open-world nature of the game means that you might only discover these mini-tutorials later.
- Proving Grounds - Link will have no armor or weapons, and you have to rely on the tools in the arena. You'll have to defeat the Constructs that are guarding the place.
- Rauru's Blessing - You only need to open the chest and claim the Blessing of Light.
- Shrine Quests - As you explore, you might find Shrine Quests that need to be completed. Only then will the Shrine itself actually spawn. That Shrine may have its own challenge, or just Rauru's Blessing for a quick reward. Some examples of Shrine Quest objectives include:
- Sky Crystals - Bring the green crystal to the pedestal.
- Time Trial - Pass through the green rings within the time limit.
- Light and Mirror Puzzles - Use Zonai Mirrors to reflect the beam of light to the target.
- Riddles - Hear a riddle about a Shrine's possible location.
- Labyrinths - Some Shrines can only be found in the Surface and Sky Labyrinths, which are maze-like mini-dungeons.
One more important concept to note is that the Depths World does not have any Shrines. However, Shrine locations in the Surface region correspond to Lightroot locations in the Depths, and vice versa. In fact, if you open the world map and look at a Surface Shrine, say, "Mayachin," and then open the Depths map, you'll notice that the name is just reversed/mirrored: "Nihcayam Lightroot."
In short: any Shrine you find will have an equivalent Lightroot in the Depths below; any Lightroot you find in the Depths will have a Shrine above.
Shrine maps: Surface World
For our Zelda: Tears of the Kingdom Shrines guide, we've opted to divide the Surface World into north and south portions. However, due to the layout of the game world, we've categorized them per region.
We'll also add some general info on what you can expect in the Shrine itself. In some cases, due to the complexity or trickiness of puzzles, that Shrine may have its own guide.
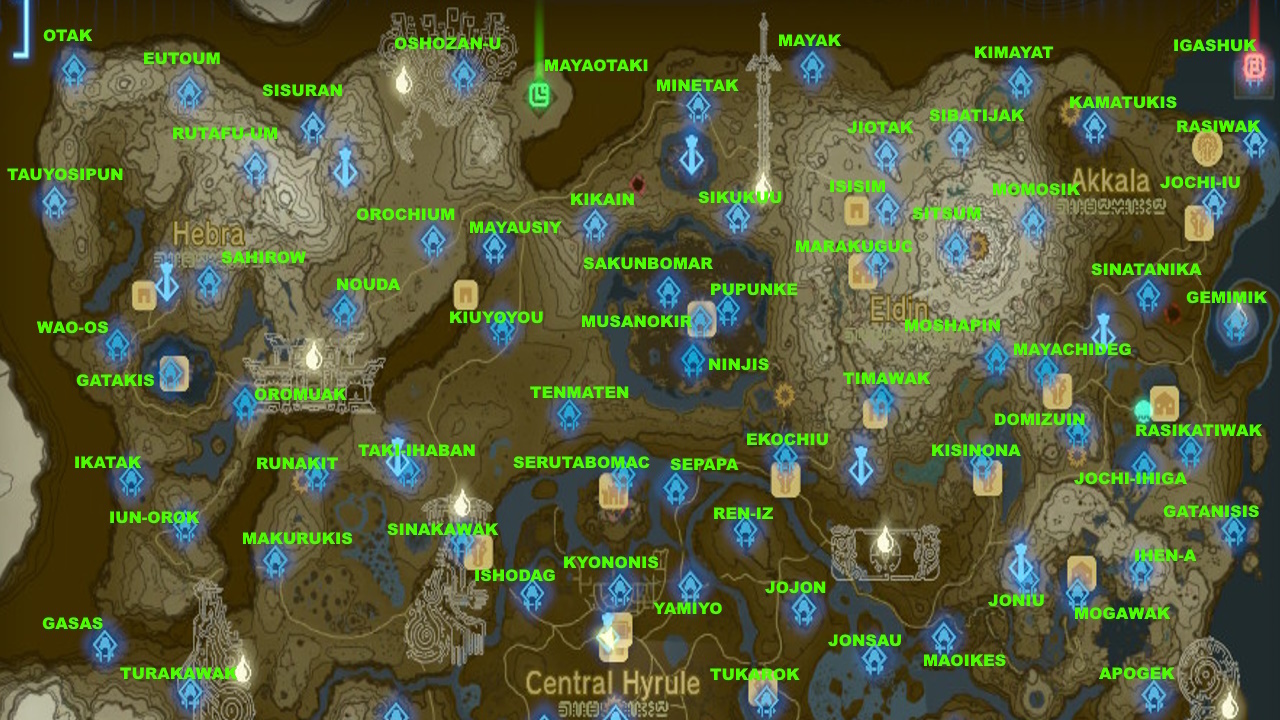
North Surface World Shrine map
These are the Zelda: Tears of the Kingdom Shrines in the northern portion of the Surface World.
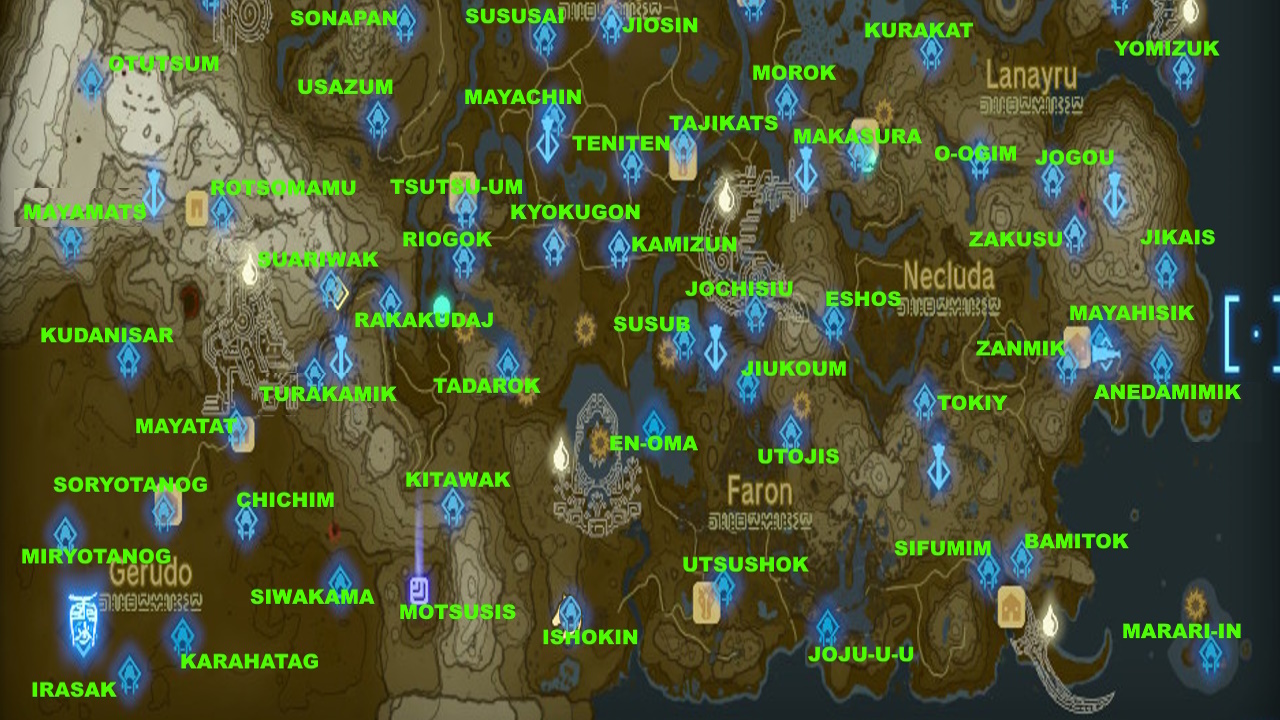
South Surface World Shrine map
These are the Zelda: Tears of the Kingdom Shrines in the southern portion of the Surface world.
Hebra Shrines
Eutoum
- Location: In Gollam's Secret Hot Springs in Hebra North Crest.
- Objective: Proving Grounds (Infiltration) - You can stealthily eliminate Constructs, but it's not required.
- Location: The main Shrine in Rito Village.
- Objective: Use wind currents via updrafts and fans.
Orochium
- Location: In the middle of a snowfield.
- Objective: You'll drop down a few times so you can use Ascend.
- Location: Near the Fortress Geoglyph, surrounded by thorny vines that you need to burn.
- Objective: Attach Zonai Rockets to reach new areas.
- Location: Along the top-right portion of the Headdress Geoglyph.
- Objective: Attach Rockets and other objects to make the beams hit the target.
Otak
- Location: Head to the northwestern tip of the map, and drop down the snowfield once you're past the mountains. Use Fire Fruits or a Flame Emitter to melt the ice. Keep doing this until you reach the Shrine down below the cave.
- Objective: Province Grounds (Traps) - You'll spot several objects here that can be used as traps. Examples include explosive barrels, rope lanterns that can burn leaves, and boulders that you can Fuse onto a weapon to smash the middle platform.
Rutafu-um
- Location: In the northwestern portion of Hebra Mountains, you should find a cave with an underground pond. The crystal is underwater, so use the Wing devices to get closer, then pull it out with Ultrahand.
- Objective: Rauru's Blessing.
- Location: Just east of the Rospro Pass Skyview Tower.
- Objective: The goal is to jump and crouch to get past lasers. For the last section, you'll have to jump, crouch, and wait for the overhang so you can pop Ascend.
Sisuran
- Location: At the lower portion of the north-central ridge, you'll find a pedestal and a crystal. Once you get close enough, a Frost Talus will emerge. Use Fire Fruits or Yunobo's ability to melt and stun it. You may then climb up its head to smash the crystal.
- Objective: Rauru's Blessing.
- Location: On the snowfields along the western portion of the Hebra region.
- Objective: Use Recall to make the balls roll backward.
Wao-Os: White Bird's Guidance (Shrine Quest)
- Location: From the very top of the huge rock formation in Rito Village, look to the northwest. You should see the outline of a white bird carved into the mountain. Fly there to find the cave.
- Objective: The idea is to drop blocks on the edge of a board so as to catapult the ball to the target.
Tabantha Shrines
- Location: In the southwestern edges of the Tabantha region, next to the Gerudo border.
- Objective: Pull the ropes toward you, then let go. Pop Recall and shoot the rope with your bow.
Ikatak
- Location: Head down Gisa Crater to grab the crystal. You can use various tools in the area, or just pop a Hot Air Balloon via Autobuild.
- Objective: Rauru's Blessing.
Iun-Orok
- Location: Due southeast of Ikatak Shrine/Gisa Crater, you'll find the Tanagar Canyon West Cave. There are a lot of obstacles here, so you'll need Yunobo and Riju here for their boulder-breaking abilities. Otherwise, you'll have to waste a lot of Bomb Flowers or blunt/mallet-type weapons.
- Objective: The idea is to combine the spheres together so that they roll in a certain direction. Alternatively, you could just make something that could "hang" over the target. If it hits the target when you drop it, you'll complete the puzzle.
Mayausiy
- Location: Found in the Forgotten Temple. You'll have to head here while doing the Geoglyphs/Dragon's Tears main quest.
- Objective: Rotate jumbled stone blocks so they can fit in the puzzle design.
Nouda
- Location: Northeast of the Fortress Geoglyph, you'll see the Kopeeki Drifts Cave. If you don't have a lot of hearts, try to avoid the freezing water as you make your way to the Shrine.
- Objective: Proving Grounds (Intermediate) - This is mostly just a regular battle against Constructs.
Turakawak
- Location: The bottom-left section of the Lady Geoglyph. Assuming it's raining, you'll need to find the right spot to reach the Shrine. You can climb up the trees and glide to the entrance.
- Objective: Stack up blocks so you can Ascend to higher ledges.
Hyrule Shrines
- Location: The main Shrine for the Woodland Stable.
- Objective: Allow blocks to fall, then use Rewind so you can reach the top.
Ishodag
- Location: Just northwest of Lookout Landing, before the bridge that leads to New Serenne Stable.
- Objective: Use and attach fans to move vehicles.
- Location: Right next to the Hyrule Field Chasm.
- Objective: Use Ultrahand to rotate the object so that its shape matches the gaps.
Jojon
- Location: East of Hyrule Castle, you'll find Crenel Peak. Head deeper into the cave to reach the Shrine.
- Objective: Proving Grounds (Rotation) - For the most part, you'll just need to manage the spinning gears and fire traps as you're killing enemies.
Kamizun
- Location: In the southern portion of Hyrule as you follow the main road from Lookout Landing.
- Objective: Proving Grounds (Beginner) - Funnily enough, this is supposed to be the tutorial for beginners, and yet it's in the opposite direction (assuming you're heading to Hebra/Rito first).
Kikakin
- Location: On a mountain range northwest of the Great Hyrule Forest.
- Objective: Grab a Zonai Light to see in the dark.
- Location: On a grassy field further west of the Great Hyrule Forest.
- Objective: Melt ice blocks using flames so they can be placed on floor switches. In the second chamber, you can use the stone plate to block the flame jets, ensuring that the cube is large enough. Attach the two and slide them over to the initial area. The plate can block the flames here, too, so the ice cube and be used to press the switch.
- Location: At the foot of the Great Plateau, you'll find Addison clinging on another post. The cave is right behind him.
- Objective: The goal is to place the balls only on the required circles, which you can see via the green icons on the ceiling.
Kyononis
- Location: Smack dab in the center of the town ruins north of Lookout Landing.
- Objective: Combat Training - You'll learn about basic melee combat actions, such as parrying, dodging, and Flurry Rush sequences.
Makurukis
- Location: Along the southwestern portion of Hyrule Ridge.
- Objective: Combat Training - You'll learn about archery and shooting enemies with your bow.
- Location: Continue heading south past the Central Hyrule marker.
- Objective: Plant the Stake through the central device, then attach logs. This will let you hit the switch to swing a makeshift bat, striking the ball to the target.
Ren-Iz
- Location: Near the peak of Crenel Hills.
- Objective: Use the metal planks at an incline to get the ball to the target.
Riogok
- Location: In the lower hills of the Great Plateau.
- Objective: The idea is to attach objects so that they transfer the rotational force between two gears.
- Location: In the northwestern portion of Hyrule Ridge.
- Objective: Use planks and plates so the ball can be moved across the rails.
- Location: East of the floating Hyrule Castle.
- Objective: Use Recall to control the moving blocks and board boats.
- Location: On one of the broken structures in the exterior of the floating Hyrule Castle.
- Objective: Attach metal boards to create taller structures. These will let you use Ascend so you can reach the top.
Sinakawak
- Location: The main Shrine for New Serenne Stable.
- Objective: You'll use candles/braziers to make hot air balloons rise.
Sonapan
- Location: At the other hilltop along Hyrule Ridge.
- Objective: Move around blocks so you can use Ascend on higher ledges.
Susuyai
- Location: Slightly southeast of the Central Hyrule place name, or west of the Jiosin Shrine.
- Objective: Avoid getting hit by the moving vehicles by riding one. At the very end, attach it to a rail to reach the altar.
Tadarok
- Location: You'll need to gain access to the Great Plateau while doing A Call From the Depths quest. Then, head to the southern snowfield. Check the cave next to the waterfall to find the Shrine.
- Objective: You'll use fire, ice, and lightning on various types of blocks.
- Location: This is the main Shrine for the Riverside Stable, which is southeast of Hyrule Field.
- Objective: Combine/attach logs to create bridges or boats.
Taki-ihaban
- Location: There's a cave slightly southeast of the Lindor's Brow Skyview Tower. Watch out, though, because you'll have to fight a couple of tough Gloom-afflicting enemies. If you've progressed further in the campaign, then you know these hostiles that we're hinting at.
- Objective: Rauru's Blessing.
Teniten
- Location: Along the road as you go south of the Central Hyrule marker.
- Objective: Combat Training - You'll learn about how to throw weapons.
Tenmaten
- Location: From the floating Hyrule Castle, make your way northeast across the river. You should see the Elma Knolls Well near the foot of the hill. Enter it and make a Hovercraft to reach the Shrine.
- Objective: Rauru's Blessing.
- Location: This acts as the main Shrine for the Outskirt Stable, which is in the southwestern part of Hyrule.
- Objective: You'll plant stakes along the wall to hold ledges and cause the ball to roll toward a certain direction.
Usazum
- Location: You'll find the pedestal at the southern portion of Satori Mountain. The crystal is inside a cave guarded by a Hinox.
- Objective: Rauru's Blessing.
Yamiyo
- Location: At the eastern side of the town ruins near Lookout Landing.
- Objective: Combat Training - You'll learn how to throw materials/items here.
Great Hyrule Forest Shrines
There are four Zelda: Tears of the Kingdom Shrines in the Great Hyrule Forest. However, the fog will keep you out. You'll first need to cleanse the Deku Tree to gain access to the rest of the zone.
- Location: The Korok hub in the Great Hyrule Forest. You'll emerge right in front of it once you leave the Depths portion.
- Objective: Use the ball and chain devices to create swinging pendulums.
Ninjis: Maca's Special Place (Shrine Quest)
- Location: As you attempt to leave the Korok hub going south, Maca will stop you. This is a clue regarding the Shrine. You have to skydive from the Typhlo Ruins Skyview Tower straight down the Shrine's location.
- Objective: Rauru's Blessing.
Pupunke: A Pretty Stone and Five Golden Apples (Shrine Quest)
- Location: As you attempt to head to the east from the Korok hub, you'll encounter a Korok who doesn't want to let go of the crystal. You'll have to travel to the Mido Swamp to collect five Golden Apples before you can interact with the crystal. After that, bring it to the pedestal.
- Objective: Rauru's Blessing.
Sakunbomar: None Shall Pass
- Location: As you try to go northwest from the Korok hub, someone will tell you about the dangers that lurk ahead. Continue up the path, ignoring most of the mobs. Once you see the pedestal and the crystal, a Stone Talus will emerge. Climb on top of it and destroy the crystal so you can bring it to the pedestal.
- Objective: Rauru's Blessing.
Eldin Shrines
Isisim
- Location: Once you arrive at YunoboCo HQ, check the eastern cave near it.
- Objective: Proving Grounds (In Reverse) - The idea is to work your way from the back/top, which has fewer enemies.
Jiotak
- Location: Due north of Isisim Shrine, you'll find a rock formation that looks like a crab. Enter the cave, called the Isle of Rabac Gallery, and ride the mine cart. The idea is to flip the switches along the rails by using Yunobo's Rolling Fireball, enabling you to reach the Shrine.
- Objective: Rauru's Blessing.
Kimayat
- Location: Found at the northeastern portion of the zone near the border with Akkala.
- Objective: Proving Grounds (Smash) - Eliminate the Constructs on the ground. You can also collect Ice Fruits, as well as Fuse a spiked ball from the left-hand side. Once ready, create ice platforms by shooting the pool of water with an Ice Fruit arrow. Once you smash the support pillar, the remaining Constructs will fall and drown.
Kisinona
- Location: Acts as the main Shrine for Foothill Stable, which is south of Death Mountain.
- Objective: Attach two fans on opposite sides of the wheel and turn them on. Then, move close to the center of the wheel and use Ultrahan to grab one of the fans. Lean both thumbsticks toward the same direction, causing Link to rotate faster.
- Location: This acts as the main Shrine for Goron City.
- Objective: Create large ATV-esque vehicles by attaching wheels to them, allowing you to cross the lava flows.
- Location: Found in the northern portion of the zone, next to the gargantuan skeleton of an Eldin Beast.
- Objective: Speed is of the essence here. You need to make the ball roll, then quickly hit the pillar switch to activate the bullseye target.
Minetak
- Location: Directly north of the Typhlo Ruins Skyview Tower, you'll find the Deeplian Badlands Cave.
- Objective: Rauru's Blessing.
Momosik
- Location: Found along the eastern summit of Death Mountain. Make sure Yunobo is with you so you can quickly destroy the rocks blocking the path. Inside the cave, ride the cart and bring the crystal back with you.
- Objective: Rauru's Blessing.
Moshapin
- Location: South of Death Mountain, you'll find Lake Intenoch. Enter the cave and get the crystal. You'll then need to use the Hydrant device to create igneous rock platforms to make it across. If you have an extra Fan and Steering Stick, you can drive an igneous rock platform with the crystal attached to it.
- Objective: Rauru's Blessing.
Sibatijak
- Location: Found along the northern slopes at the foot of Death Mountain. You're better off gliding here once you've tagged the Sitsum Shrine.
- Objective: A bit of trial and error here. You'll need to align all spinning sections of the tower by using Recall. Once fully aligned, you can use Ascend to reach the top.
- Location: Along the trail heading to Death Mountain.
- Objective: Use Rewind on the gears to cause the small balls to fall to the right spot.
Sitsum
- Location: Upon reaching the summit of Death Mountain, you'll be able to tag this Shrine, which is on a lower ridge. Make sure you do this before heading back to Goron City, or you're gonna have to take another long trek just to return here.
- Objective: Attach a Steering Stick to the ATV vehicle so you can drive across lava flows.
Timawak
- Location: Overlooking the Bedrock Bistro (hot springs and restaurant).
- Objective: The Hydrants that spew water will create igneous rock platforms that you can use to get across lava flows.
Akkala Shrines
- Location: Upon reaching Akkala Span, which is southwest of Death Mountain, you can climb the bridge ruins. At the top of the tower, you'll find this Shrine.
- Objective: There is a gigantic cube that can be rotated horizontally and vertically using separate controls. However, this will also change the orientation of the ledges that you need to use to climb to the top.
Gatanisis
- Location: Make your way to the easternmost cliffside of the Akkala region, just across the gap from the island chains.
- Objective: The goal is to use Recall at the right moment, causing the ball to bounce higher to hit the target.
- Location: Found in the northeastern portion of the region. This is the "swirly beach" where you'll discover the last Geoglyph/Dragon's Tear.
- Objective: You'll need to power up a battery, which can then have a Flame Emitter attached. You'll have to light the braziers before water puts out the flames.
Jochi-Ihiga: Rock For Sale (Shrine Quest)
- Location: Head to Tarrey Town and buy the Sky Crystal from the merchant. Then, ride the tram to the opposite bank. From there, you'll need to build a hovercraft to reach the pedestal. However, due to the weight of the crystal, it might sink. You'll probably want to attach a Rocket facing diagonally upward just in case.
- Objective: Rauru's Blessing.
- Location: Acts as the main Shrine for the East Akkala Stable.
- Objective: Think of this as akin to Jenga or UNO Stacko. You'll need to remove blocks while preventing the ball from falling.
Kamatukis
- Location: Found in the ravine of Deep Akkala.
- Objective: Attach the large block so you can make a hammer pendulum, which will then hit the ball toward the target.
Mayachideg
- Location: Acts as the main Shrine for the South Akkala Stable.
- Objective: Proving Grounds (The Hunt) - Activate Homing Carts so they can damage and distract the enemy Constructs. While they're busy, look for other Zonai Devices, like the Cannon, to take them out.
Rasitakiwak
- Location: Found in the southern tip of the Akkala region close to the border with Lanayru.
- Objective: Proving Grounds (Vehicles) - You can ride on a larger vehicle to ram the Constructs.
- Location: Check the beach along the northeastern coast.
- Objective: The idea is to use Ultrahand to push down the beach balls, which will make them bounce higher.
Sinatanika
- Location: In the central portion of the region.
- Objective: Combat Training - You'll learn how to use Sneakstrike, or your stealth attack.
Lanayru Shrines
Apogek
- Location: Found in the eastern side of the region; near the Secret Stone Geoglyph.
- Objective: Use planes to carry the orbs to the destination.
Ihen-A
- Location: Found in Mipha Court where you'll meet Sidon.
- Objective: You'll want to use multiple Hover Stones to create ledges or serve as foundation for other objects that you can climb.
- Location: Southeast of the Mount Lanayru summit.
- Objective: Move blocks around, but make sure you have something above you that you can target with your Ascend ability.
Jogou
- Location: In the southwestern portion of Lanayru Bay, you'll find the Lanayru Road East Cave. Head deeper into the cave to see a large, circular rock formation. Destroy the boulders to get to the Shrine.
- Objective: Rauru's Blessing.
Joniu
- Location: From the Upland Zorana Skyview Tower, make your way south until you see Ralis Pond. You'll notice the Ralis Channel, a tunnel that leads to the east of that. Use a Hovercraft to bring the crystal to the pedestal.
- Objective: Rauru's Blessing.
Jonsau
- Location: Found in the middle of the Lanayru Wetlands.
- Objective: Use Ultrahand to push the beach balls deeper into the water, causing them to bounce higher into the air.
Kurakat: Dyeing to Find It (Shrine Quest)
- Location: Northeast of Kakariko Village, there's an oddly-shaped rock formation near a bandit camp with a giant skull. The friendly Construct tells you about a riddle. The goal is to align the shadow of the rock formation with the pattern.
- Objective: Rauru's Blessing.
Maoikes
- Location: You'll see a hilltop with a giant skull overlooking Lanayru Wetlands. Head inside the skull to find a tunnel with a Shrine.
- Objective: Rauru's Blessing.
Mogawak
- Location: Acts as the main Shrine for Zora's Domain.
- Objective: You'll make use of various contraptions, such as battery-powered devices and chains that you can target with Rewind.
Morok
- Location: On a small floating island to the southwest of Lanayru Wetlands.
- Objective: Use springs and push blocks to get to the top.
O-Ogim
- Location: Between Kakariko Village and the Mount Lanayru Skyview Tower, you'll see a bird-shaped lake. Lanayru Promenade can be found here, too. Claim the crystal, then create a Rocket-powered Fanplane by using the devices near it. You should then be able to fly the crystal to the pedestal.
- Objective: Rauru's Blessing.
Tukarok
- Location: Acts as the main Shrine for Wetland Stable, which is west of Lanayru Wetlands.
- Objective: Use platforms and wheels that can travel along raised bars.
Yomizuk: True Treasure (Shrine Quest)
- Location: Head to the southern tip of the peninsula with the Kidney/Secret Stone Geoglyph. You should find Tarm Point Cave there. Down below, you'll meet Sasan, and he wants to reach Finley. You have to control the raft in a chamber with irregular water levels. If you have a Steering Stick and a Zonai Fan, then things will be easier.
- Objective: Rauru's Blessing.
Zakusu: The High Spring and the Light Rings
- Location: You'll receive this quest from an NPC named Nazbi, just below the Mount Lanayru Skyview Tower.
- Objective: The riddle pertains to a key-shaped floating island, which you can reach by using the nearby Skyview Tower. From there, clear the time trial challenge as you go down the snowy pass. You can try to Shield Surf as you're dropping down by holding ZL and pressing B.
Necluda Shrines
Anedamimik
- Location: From Hateno Village/Robbie's Lab, go directly east. You'll find the Deepback Bay Cave, which has this Shrine. It's partially submerged, so you have to head down below to destroy the rocks using a Bomb Fruit.
- Objective: This Zelda: Tears of the Kingdom Shrine simply requires you to cast Recall to move the ball back to its original spot. However, you also have to flip the switch so the target can move, too.
Bamitok
- Location: If you've been doing the Lurelin Village side quests, you'll likely hear your Purah Pad Sensor pinging you about a nearby Shrine. Follow the sound and you'll reach Mount Dunsel Cave. In the deeper recesses, you'll find this Shrine.
- Objective: Rauru's Blessing.
Eshos
- Location: Found along the cliffs of the mountain range dividing Necluda and Lanayru.
- Objective: Combat Training (Shields) - You'll need to do a perfect parry so you can reflect the projectiles back at the attackers. Use the Wooden Shield against lightning projectiles, and the Rusty Shield against fire projectiles.
Jiukoum
- Location: Slightly southeast of the Popla Foothills Skyview Tower.
- Objective: You'll use stone boards to cross rails, or just Shield Surf to speed things up. However, the third part can be a little annoying, as you need to place an extra movable board-cart before the one you're riding falls off. Shield Surfing can also be a little problematic due to the steeper incline and iffy controls. We just ended up creating a structure that lets Link cast Ascend.
- Location: Found near the "mouth" part of the Dragon Geoglyph. You should see a small nook where a friendly Construct is chilling (pun intended). The idea is to place ice plates into the sockets. You can change their size by melting them with fire.
- Objective: Rauru's Blessing.
Joju-u-u
- Location: Found in the southern point of the map.
- Objective: You'll attach the end of each bridge to lift the whole thing.
Makasura
- Location: Acts as the main Shrine for Kakariko Village.
- Objective: The idea is to use the L-shaped structures as overhangs so you can climb. In the final part, you'll use it as a catapult so Link can get across the chasm.
Marari-In
- Location: You'll want to clear the pirate hideout in Eventide Island, which is all the way at the southeastern tip of the world. Then, at the top of the ship, use the boards to get across the spike-filled wall.
- Objective: Rauru's Blessing.
Mayahisik
- Location: Once Robbie gives you the Purah Pad Sensor in Hateno Village, you'll detect this Shrine in the cave below the lab.
- Objective: Rauru's Blessing.
Sifumim
- Location: Found in the southeastern portion of the region. This acts as the main Shrine for Lurelin Village.
- Objective: Proving Grounds (Flow) - There are a couple of water-filled sections that Constructs are guarding. You can do headshots with your bow to knock them into the water.
Susub
- Location: Look for the Deya Village Well west of the Popla Foothills Skyview Tower.
- Objective: Rauru's Blessing.
Tokiy
- Location: Directly north of the Rabella Wetlands Skyview Tower, you'll find Oakle's Navel. Enter the cave and grab the crystal. As soon as you do that, a path will open up. Avoid the boulders and make it all the way to the end. In the last tunnel, use Recall just as the boulder gets near you.
- Objective: Rauru's Blessing.
Utojis
- Location: Slightly northeast of the Faron place name, you'll find the Tobio's Hollow Cave. Deep below, you should see several Zonai Spears. Fuse a Keese Wing onto one (since there are so many that you'll fight as you're heading to this area). Then, throw it in the center of the green circle.
- Objective: Rauru's Blessing.
Zanmik
- Location: Acts as the main Shrine for Hateno Village.
- Objective: Attach boards to the giant gear, then attach metal balls to said boards. You can then spin the gear so at least one of the balls ends up at the topmost ledge.
Gerudo Shrines
Chichim
- Location: This is a Secret Shrine found by going through the Ancient Prison Ruins. You'll need to sink into the quicksand south of Palu Wasteland to reach the location.
- Objective: Rauru's Blessing.
Irasak
- Location: Found along the desert's sand dunes. You'll want to use one of the pillars from the light triangle puzzle (part of the main quest), then glide to get past the quicksand.
- Objective: Rauru's Blessing.
- Location: Found in the southern portion on the desert dunes; east of Irasak Shrine.
- Objective: Place the brazier/candle underneath the fonts. Step on the switch to lower the floor, then use Recall on the brazier. This will light the fonts instead.
Kitawak
- Location: Directly north of the Gerudo region Labyrinth.
- Objective: You'll be attaching stone plates to each other to reach new areas.
Kudanisar
- Location: Along the northern portion of the desert close to the highlands portion.
- Objective: Start out by attaching wooden boards to cross the quicksand. Then, you'll want to use a Hoversled to reach the ball.
Mayamats
- Location: In the southwestern tip of the Gerudo Highlands zone.
- Objective: Attach the spheres and lift them. You'll also need to use Recall to get them to roll back up top or toward the opposite direction.
Mayatat
- Location: Acts as the main Shrine for Kara Kara Bazaar.
- Objective: Attach Steering Sticks to Zonai Sleds, allowing you to drive across quicksand.
Miryotanog
- Location: Directly north of the Lightning Temple.
- Objective: Proving Grounds (Lure) - There are several lasers that will trigger flame or sphere traps, likely killing most Constructs. Try to trick them into wading past lasers.
Otutsum
- Location: In the northwestern ridge of the Gerudo Highlands zone.
- Objective: Rauru's Blessing.
Rakakudaj
- Location: From the Gerudo Canyon Skyview Tower, glide northeast and drop down the ravine. You should see a pedestal, but the crystal is further downriver. Once you get there, use vehicles to speed things up.
- Objective: Rauru's Blessing.
Rotsamamu
- Location: Found in the Highlands next to a Yiga Clan Hideout.
- Objective: Place boards and blocks on seesaws so one side rises.
Siwakama
- Location: Directly west of the Gerudo Labyrinth.
- Objective: Attach the spheres and use Recall to get up higher ledges.
Soryatonog
- Location: Acts as the main Shrine for Gerudo Town.
- Objective: Use Fans to blow away the sand and reveal the objects and chests that you need.
- Location: This Secret Shrine can only be accessed once you've completed the Yiga Clan Exam side quest.
- Objective: Rauru's Blessing.
Turakamik
- Location: Southwest and fairly close to the Gerudo Canyon Skyview Tower.
- Objective: You'll need to attach the ball-and-chain fixtures to conduct electricity. Do the same for the top floor where you'll attach it to the metal bar.
Faron Shrines
En-Oma
- Location: Get sucked into the giant whirlpool in Lake Hylia. You can then activate the pedestal, and you'll see that the beam is way up high.
- Objective: Use the Popla Foothills Skyview Tower to reach the floating island with the crystal. There should be a hole in the floor, so just drop the crystal there, as it will go straight into the whirlpool. Dive back down and carry it to the pedestal.
Ishokin: Ride the Giant Horse (Shrine Quest)
- Location: For this Zelda: Tears of the Kingdom Shrine, you need to go further south of the Frog Geoglyph. Along the rocky crags, you'll meet an NPC named Baddek. He won't give you the Sky Crystal until you can tame and mount a Giant Horse. You can ask for clues in Highland Stable.
- Objective: Rauru's Blessing.
Utsushok
- Location: This is the Shrine that's close to Highland Stable.
- Objective: Attach boards/plates to hit the orbs to the target. At the end, you'll also need to hit the cart so you can get across. Alternatively, you can Shield Surf.
Labyrinth Shrines (Surface)
The following Zelda: Tears of the Kingdom Shrines can only be accessed by going through the three Labyrinths on the world map. We'll have a guide for these locations soon, so stay tuned.
Shrine maps: Sky World
For the Sky World, we've also divided them into north and south portions (with the Great Sky Island starting area belonging to the southern portion). Take note that you'll need to progress further in the campaign to access some areas. Likewise, we've further subdivided some of these based on related themes. For instance, we have a category for the Shrines that are unlocked as you're getting the Wingsuit.
North Sky World Shrine map
These are the Zelda: Tears of the Kingdom Shrines in the northern portion of the Sky world.

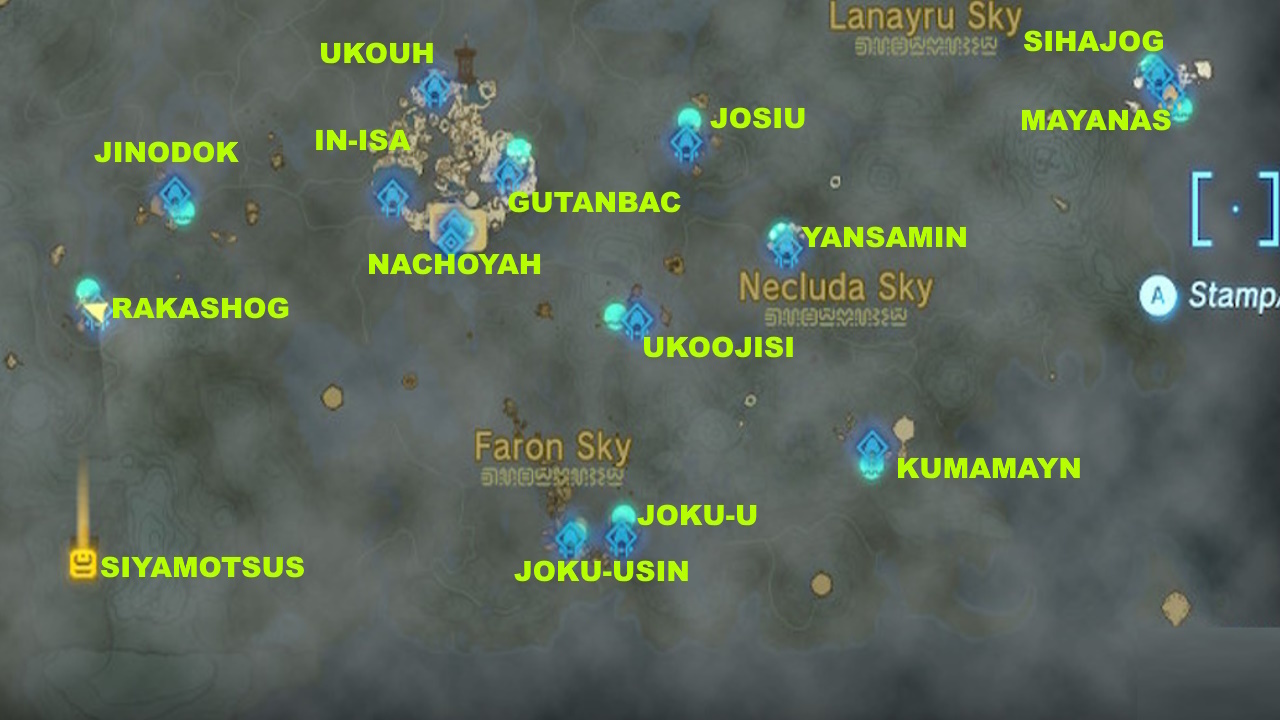
South Sky World Shrine map
These are the Zelda: Tears of the Kingdom Shrines in the southern portion of the Sky world.
Great Sky Island Shrines
There are four Zelda: Tears of the Kingdom Shrines to be discovered as you're exploring the Great Sky Island starting area. All of these teach you abilities that you'll use throughout the game.
Ukouh
- Location: Northern portion of the Great Sky Island.
- Objective: This is where you'll learn the Grab/Attach command for the Ultrahand.
In-Isa
- Location: Western portion of the Great Sky Island.
- Objective: This is where you'll learn the Fuse ability.
Gutanbac
- Location: Northern portion of the Great Sky Island.
- Objective: This is where you'll learn the Ascend ability.
Nachoyah
- Location: Southern portion of the Great Sky Island; directly above where you started the game.
- Objective: This is where you'll make use of the Rewind ability.
Wingsuit-related Shrines
There are three Shrines that are unlocked as you're doing the skydiving time trial challenges for the Wingsuit. Simply pass through all the rings during your practice runs, and their respective Shrines should appear.
Taunhiy
- Location: Courage Island - Tabantha Sky Archipelago.
- Objective: Combat Training - You'll learn about aiming with your bow while in mid-air to slow down time.
Simosiwak
- Location: Bravery Island - North Hyrule Sky Archipelago.
- Objective: Proving Grounds (Lights Out) - You'll have to battle Constructs in the dark. There are light sources that you can use though.
Sihajog
- Location: Valor Island - South Lanaryu Sky Archipelago.
- Objective: Rauru's Blessing.
Sky Crystal Beam-related Shrines
These Shrines will only be formed after you bring the green crystal in the distance. The beam will let you know the general location, but you need to think of ways to return it to the target area.
Ganos
- Location: Tabantha Sky Crystal - The crystal can be pulled away from a Flux Construct.
- Objective: Rauru's Blessing.
Gikaku
- Location: Found in the northeastern portion of the map; reachable via the Natak Shrine - Use devices/vehicles to reach the crystal at the topmost island, then drop it all the way down below.
- Objective: Rauru's Blessing.
Jinodok
- Location: South Hyrule Sky Archipelago - Rotate the control device to form a bridge across the floating islands, then bring the crystal back to the pedestal.
- Objective: Rauru's Blessing.
Josiu
- Location: North Necluda Sky Crystal - The two floating islands are separated by a huge gap. You can think of contraptions, such as several boards that are attached together, or a rocket-powered platform, so you can bring the crystal to the other side.
- Objective: Rauru's Blessing.
Kumamayn
- Location: East Necluda Sky Archipelago - Once you reach the crystal, you can use the spring contraption on a nearby island to bounce it back to the pedestal.
- Objective: Rauru's Blessing.
Mayam
- Location: North Hyrule Sky Crystal - The crystal can be pulled out of a Flux Construct.
- Objective: Rauru's Blessing.
Mayanas
- Location: South Lanayru Sky Crystal - The crystal is on another floating island that's high up. Use Ascend or a Zonai Device to get up higher, then bring it back to the pedestal. Just watch out for Construct Archers that are nearby.
- Objective: The goal is to use the Frost Emitter to create ice blocks, allowing you to pick up other items or slide the ice blocks/plates to the target. For the last puzzle section, you can attach the metal and ice plates in an angular formation so as to force the thing to slide sideways. Alternatively, just connect a lot of ice blocks, along with the plate, then drop it down to the target.
Natak
- Location: Sokkala Sky Archipelago - The crystal is inside the "Death Star" in this area. Get inside it, then grab the machine controls so it can be rotated. Make sure that the opening is facing the direction of the pedestal. You can use the Spring contraption to pop that crystal out of the hole.
- Objective: Rauru's Blessing.
Ukoojisi
- Location: West Necluda Sky Archipelago - The push-booster near the pedestal will let you reach the underside of the floating island, and you can Ascend from there. Create a makeshift plane so you can bring the crystal back to that spot.
- Objective: Rauru's Blessing.
Light Puzzle Shrines
As you explore the Sky World, you'll find more Zelda: Tears of the Kingdom Shrines. However, you have to solve the Light Puzzles in those areas. These are done by reflecting the beams with Zonai Mirrors until the way is open.
Ga-Ahisas
- Location: Lightcast Island (Tabantha Sky Archipelago) - Use the beam from the tower so that it passes all the way through the cavern below.
- Objective: Rauru's Blessing.
Mayasiar
- Location: Starview Island (North Gerudo Sky Archipelago) - This requires you to reach the "Death Star" (i.e. a gigantic orb in the sky). Inside, you'll redirect the beam to hit the target.
- Objective: Rauru's Blessing.
General Shrines
These other Zelda: Tears of the Kingdom Shrines are found in the Sky World. There are no specific puzzle requirements to unlock them. However, in some cases, you do need to progress a bit further in the campaign (i.e. regional main quests) just to gain access to these locations.
Igoshon
- Location: Lanayru Wellspring Island - Found as you're going through the main quest in Lanayru.
- Objective: Use water orbs to rise up further, then dash and glide to the next one. You may also use Ultrahand to grab and reposition orbs.
Ijo-O
- Location: West Hebra Sky Archipelago.
- Objective: Block flames with the stone plate, then Fuse a Rocket to your shield to gain a huge upward boost.
Jirutagumac
- Location: This is the "Death Star" in the Lanayru Sky Archipelago.
- Objective: Attach a Wing on top of a Cart, followed by a Fan, then fly your contraption all the way to the end.
Joku-U
- Location: Faron Thunderhead Isles - This is at the end of the Thunderhead Isles portion of the main quest.
- Objective: Rauru's Blessing.
Joku-Usin
- Location: Faron Thunderhead Isles - You'll reach this while going through Thunderhead Isles as part of the main quest.
- Objective: Proving Grounds (Short Circuit) - This one is all about grabbing Shock Fruits or Shock Emitters, and using them to defeat Construct foes.
Kadaunar
- Location: Eldin Canyon Sky - Use fan-powered carts to reach the floating island.
- Objective: Use Hydrants to create igneous rock platforms. These will let you cross the lava flows.
Kahatanaum
- Location: Hebra Rising Island Chain - You'll come across this Shrine as part of the Hebra region main quest. You'll need to progress a bit further until you're going across the floating rocks to reach the tornado.
- Objective: Rauru's Blessing.
Mayaumekis
- Location: Hebra Rising Island Chain - You'll come across this Shrine a little bit after Kahatanaum.
- Objective: Shoot the crystal switch through the barricade to open the gate. Then, jump on the sails to get up higher.
Rakashog
- Location: Gerudo Highlands Sky.
- Objective: There are several Zonai Mirrors in this puzzle area. Use them to reflect the beams of light so they can hit the targets.
Yansamin
- Location: Lanayru Sky/Zonaite Forge Island - This is the tall island in this region, one that has several circular protrusions. To reach it, wear Zora Armor and swim-climb up the "sky waterfall" in Lanayru. From there, ride a rocket-powered Hover Block. On the island itself, interact with the terminal to activate updrafts/wind currents. Once you get to the top, you'll have to skydive through the center pit, all while avoiding lasers.
- Objective: Proving Grounds (Low Gravity) - You'll have to eliminate all the Construct enemies while the low gravity effect is active.
Labyrinth Shrines (Sky)
The following Zelda: Tears of the Kingdom Shrines can only be accessed by going through the three Labyrinths on the world map. They also have counterparts up in the sky. We'll have a guide for these locations soon, so stay tuned.
There are certainly more Shrines to find and complete in The Legend of Zelda: Tears of the Kingdom. We'll continue updating this article in due course, so stay tuned.
There are numerous mechanics and facets to learn in The Legend of Zelda: Tears of the Kingdom. For more information, you can visit our guides hub.
The products discussed here were independently chosen by our editors. GameSpot may get a share of the revenue if you buy anything featured on our site.
Got a news tip or want to contact us directly? Email news@gamespot.com
Join the conversation